Reviewed by Steve Ford, WB8IMY - Editor (QST - October 2001)
(NOTE:  This review can also be viewed in PDF format by clicking here)
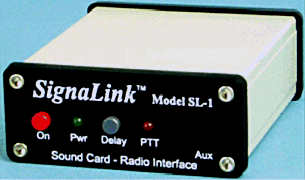

    Thanks to the boom in sound-card-based Amateur Radio software, there is a burgeoning market for devices to interface computer sound cards to transceivers. These devices are designed to handle audio signal interfacing as well as transmit/receive switching. Functionally speaking, the interfaces have a lot in common, but there are some features that set them apart.

     The SignaLink SL-1 is a contender in the miniature interface field. The SL-1 is slightly smaller than a pack of cigarettes but attractively designed to make the most of its meager surface area. The front panel includes a POWER ON/OFF pushbutton switch, a pushbutton DELAY switch (to toggle between longer and shorter transmit/receive switching times) and two bright LEDs to indicate power (green) and PTT activation (red). These LEDs are especially handy; you know at a glance when the SL-1 is powered on and when it is keying the PTT line to transmit.


Installing the Interface

     The SL-1 is designed to work with just about any computer and radio combination. Two 1/8-inch stereo jacks on the rear panel are for the audio cables to your sound card. One cable attaches to your sound card MIC or LINE input; the other connects to the SPEAKER or LINE output.

     The next task is getting audio to and from your radio, and dc power to the interface itself. The SL-1 allows you to make most of these connections through your rig’s microphone jack.  You can order the SL-1 with a pre-prepared cable for 4- or 8-pin round mike connectors, or for RJ-45 telephone-style connectors. For this review we ordered the RJ-45 cable for compatibility with my IC-706 transceiver. The SL-1 sports an internal IC socket that functions as a jumper block. By inserting short wire jumpers (supplied) and carefully following the instructions, you can configure the SL-1 according to the type of radio you are using. The manual provides detailed examples, showing jumper block diagrams for almost every common transceiver model. You simply locate your rig’s model number, study the adjacent diagram and insert the jumpers accordingly. It takes all of about 15 minutes, including the time required to open the SL-1’s enclosure.

     Depending on the type of transceiver you own, you may be able to tap the receive audio at the mike jack. Just install the correct jumper and you’re good to go. This is elegant in that it eliminates yet another cable, but there is a drawback. The receive audio that is available at most microphone jacks is not fixed. In other words, you’ll need to crank up your radio’s receive audio gain to provide an adequate signal to your sound card. The audio level at the microphone jack is usually less than what is supplied to the radio’s speaker (or external speaker jack). I often found that I had to turn the audio up to the point where my external speaker was blaring at objectionable levels just to get a usable signal for my sound card software. This makes it difficult to operate when the rest of the family is asleep! Fortunately, the SL-1 includes an alternate input jack for audio from your radio. You can tap the audio at the transceiver’s accessory jack where the level is fixed and unaffected by the audio gain setting. Yes, you have to use yet another cable, but it is a small sacrifice for domestic peace.

     While you can power the SignaLink SL-1 from an external dc power source, you may also be able to use "rig power."  Many modern transceivers, including my own, supply between 8 and 13.8 V at one of the microphone jack pins. This is just enough juice to power the SL-1. Install the correct jumper and you’ll eliminate the need to run wires to an external supply.


Where is the Serial Port?

    One of the first things you’ll notice when you unpack the SL-1 is the absence of a DB-9 or DB-25 serial port. In most interfaces this port connects to a serial cable that, in turn, connects to your computer’s COM port. The sound card software uses the COM port to send transmit/receive switching pulses to your radio (through the interface, of course). So where is the serial port in the SL-1?

     The SL-1 lacks a serial port because it relies on audio switching to key your radio. That is to say, it uses a VOX-style circuit to detect transmit audio from your sound card. When it senses audio from your computer, the circuit grounds the PTT line to your transceiver and switches it into the transmit mode.

     The advantage of this approach is that it frees your computer’s COM port for other applications. (I use mine with an FSK switching interface to run FSK RTTY with my sound card.) The disadvantage is that the SL-1 will key when it senses any audio from your computer—whether it is a bona fide transmit signal or a random beep. The solution is simply to switch the SL-1 off when you are not using it. The green PWR LED is a good reminder, but you need to be careful.


Conclusion

     If you’re looking for a compact, affordable interface, the SignaLink SL-1 is a worthwhile model to consider. I found it to be dependable, easy to install and virtually invulnerable to RF. The manual is quite thorough—perhaps a little too thorough.  It communicates a strong sense of caution (telling you, for example, to use a VOM to double-check the results of your jumper wiring). I found myself skipping over several paragraphs just to get to the basic what-goes-where information. On the other hand, for hams with minimal technical training and computer familiarity, the SL-1’s manual is right on target.

Manufacturer: Tigertronics, 400 Daily Lane,
Grants Pass, OR 97527; tel 800-822-9722;
www.tigertronics.com  $49.95.

This review has been reprinted with permission from QST.